**[Will's Journal](../index.html)**
(#) **2025/05/08: OIT, SSS, and Debug Rendering**
I'd like to make a better point of updating my personal blog of my activities. I enjoy looking back on my activities, observing my thoughts and struggles
throughout the days. Writing more frequently will also allow the memories of the work to be more fresh, so I can write a more detailed description of my
thoughts.
This past month I worked on quite a few things! Not that any particular one of them is difficult (well, one of them was pretty tough to wrap my head around),
they include:
- Order-Independent Transparency (Weighted-Blended OIT)
- Screen Space Contact Shadows (Bend Studio's implementation)
- Debug Rendering (Physics + Game)
- Maintenance (Serialization Mostly)
I'd like to briefly talk about each feature, the difficulties I had implementing them, and some of my opinions on what impact each of these may have on the overall engine.
(###) **Weighted-Blended Order-Independent Transparency**
Quite a mouthful it is, Weighted-Blended OIT (WB-OIT) is a pretty "simple" transparency rendering technique among the popular OIT methods out there.
The motivation behind using OIT in the first place is because transparency is fundamentally incompatible with deferred rendering; they simply do not work together at all (I'm sure someone out there has made some technique to do this though).
If I want to have transparency in my engine (which I do), then I need a way to draw transparent surfaces. It isn't uncommon (as far as I know) for engines to operate in 2 passes: 1 deferred "main pass" for all the opaque/cutout geometry, and 1 forward "transparent pass" for all the transparent surfaces.
I certainly remember reading about transparency methods in Real-Time Rendering and was captivated enough by it that I even followed up on OIT a bit outside the book.
Chris Wyman published [a survey on OIT techniques](https://research.nvidia.com/sites/default/files/pubs/2016-06_Exploring-and-Expanding/hpg16_oitContinuum.pdf) a few years ago (wow it was 2016!), which is a pretty fun read. The described techniques all seem so complicated, but I suppose
that could just be the way these published papers are written. I hear that these things are written to appear more complicated than they need to be to pass some kind of arbitrary "academia vibe-check".
I would actually maybe enjoy trying to implement the other techniques one of these days,
but I decided for now I wanted to keep things simple. That's the whole point of this game engine: implement from scratch everything that I want to, to release a game with this engine in a pretty
reasonable state. I have a long way to go - I think - before I go ahead and work on a game in this engine, but to get to that "reasonable state" I can't get bogged down implementing technically difficult techniques for every part of the engine. Otherwise, this engine won't be finished for years!
Anyway, back to OIT. Conceptually it isn't that complicated, WB-OIT itself is a fairly old technique, published all the way back in 2013. It involves accumulating the transparent surfaces into a render target, combining fragments produced in a fragment pass with each other with a
weighted-blended operation. I'm not terribly concerned with the math, though it does seem reasonable from what I can tell. Of course, the primary drawback here is that this has to be done in a forward pass. This means that lighting calculations are not decoupled from the geometry.
As one might expect this will result in a more expensive graphics pass, but this forward transparent pass only draws transparents, and right now I just don't have that many in the scene. If this ends up being a bottleneck for the engine in the future, I'd definitely consider doing it differently!
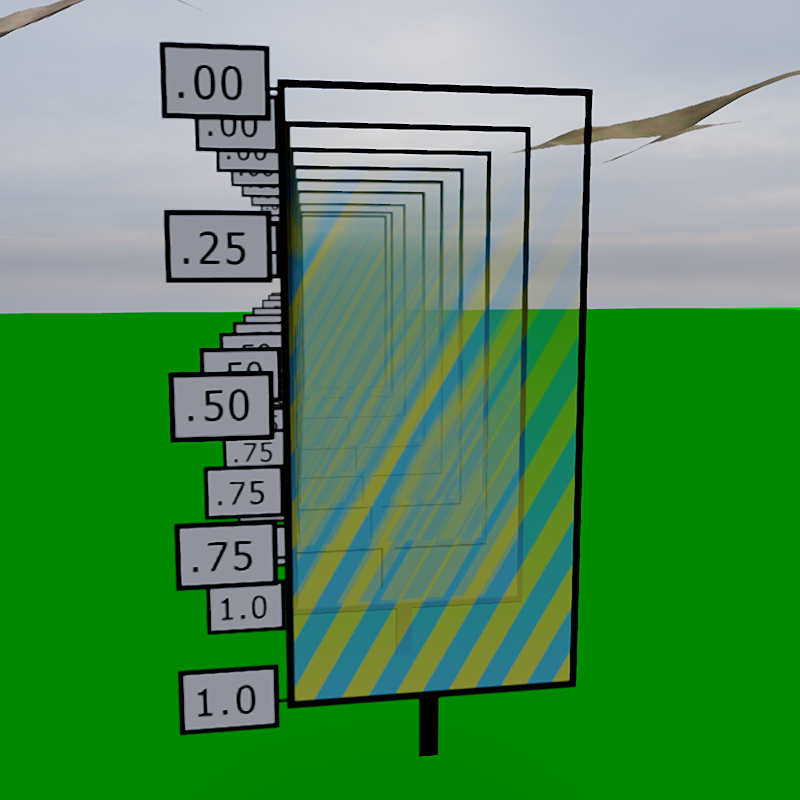
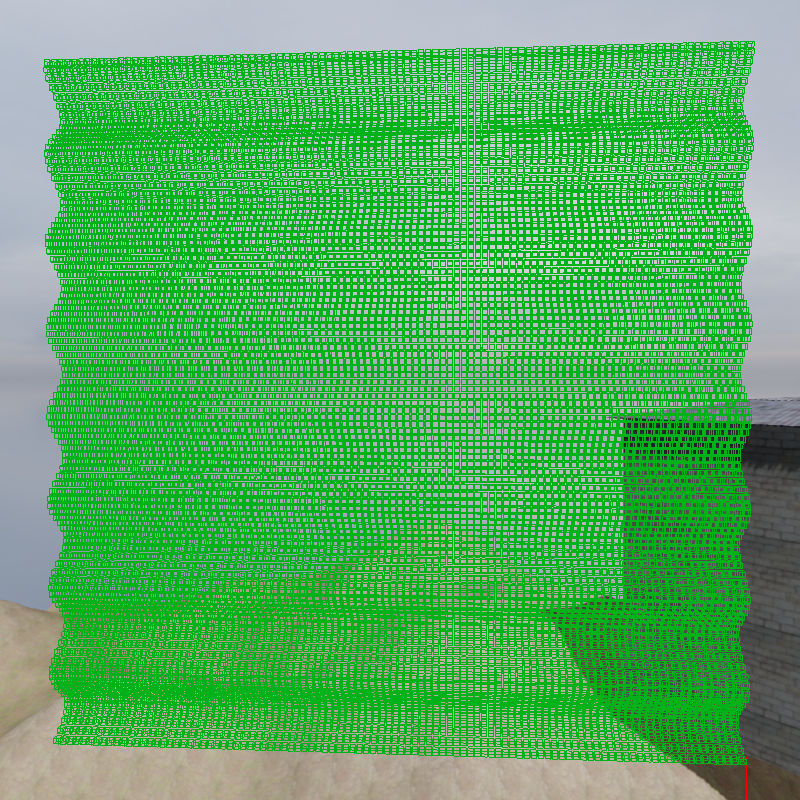
I am extremely wary of premature optimization and don't want to get caught up fixing something that isn't an issue (yet). I might not be the greatest at showcasing the engine's features, but on the right is an image of multiple of alpha-gradients back to back. Honestly looks kinda like a mess, but I think it appears decently ordered.
The process for OIT is finished off with a composite pass, combining the OIT image with the main image through another blend. Very simple and fairly easy to integrate to my renderer. Though I am increasingly concerned with the size of the engine: I'm worred that as the project grows, my ability to
"tack-on" features becomes much more difficult. For example, if adding a particle system, instead of simply adding it to the main pass, I'd need to now also add it to the transparent pass and if needed add it to the shadow pass. More to consider beyond just "stick it in there". Plus, when I do eventually implement
multi-threading, everything would just implode on itself. I am seriously entertaining the idea that multi-threading will need to be a "Will Engine V3" feature!
(###) **Screen Space Contact Shadows**
Screen Space Contact shadows is not that new of a concept, used in most modern game engines including Unreal and (I think) Unity. Attempting to improve the quality of shadows by adding shadows to small occluders that broad shadow mapping generally fails to capture.
To be honest contact shadows may have been a mistake. My scenes aren't interesting enough, geometry not complex enough, and setup not prepared enough to appropriately demonstrate the power of screen-space contact shadows.
From what little I have tested it does look pretty good, it's very impressive. Though you might be hard pressed to notice it if you weren't looking for it!
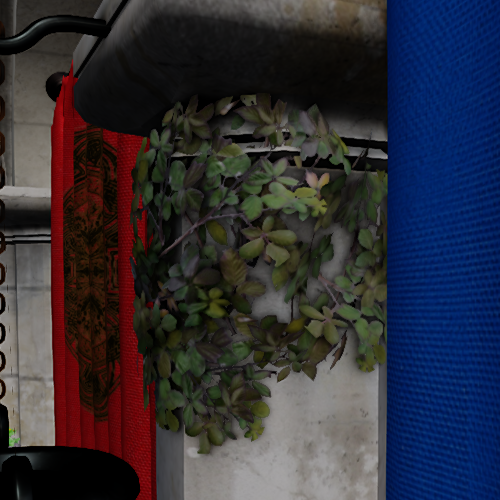
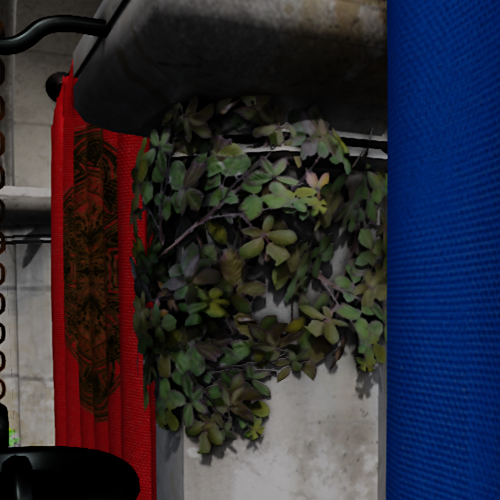
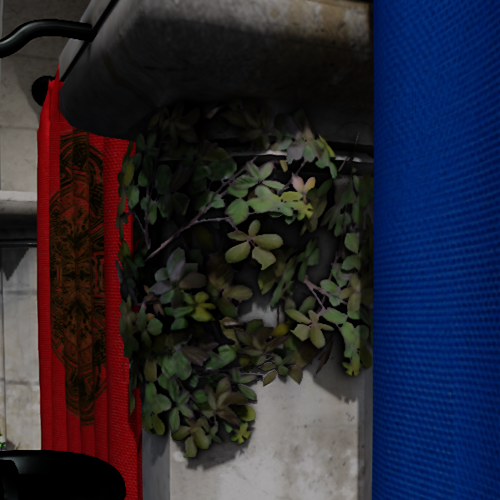
The first 2 images below have shadows from shadow maps disabled, so all shadows you see are purely from SSS. There are a lot of artifacts on large occluders, and since its a screen space shadow the shadows don't stretch very far, but SSS is meant for fine detail/geometry, The larger shadows are
meant to be generated by shadow maps, and when you combine both techniques, the shadows look much better than with exclusively shadow maps.
But its implementation is far more complex than any piece of shader code I've ever seen in my life. Give me 10 years to figure this out from scratch and I'm not sure I could finish it. Custom dispatches, shared group data, complex calculations. Usually when implementing these techniques I have
some idea of what's going on, even if I don't always understand the nitty-gritty maths, but this is squarely out of my reach. I mean, just look at this code!
```
shared float DepthData[READ_COUNT * WAVE_SIZE];
shared bool LdsEarlyOut;
void ComputeWavefrontExtents(ivec2 waveOffset, vec4 lightCoordinate, ivec3 inGroupID, uint inGroupThreadID,
out vec2 outDeltaXY, out vec2 outPixelXY, out float outPixelDistance, out bool outMajorAxisX)
{
ivec2 xy = inGroupID.yz * WAVE_SIZE + waveOffset.xy;
// Integer light position / fractional component
vec2 light_xy = floor(lightCoordinate.xy) + 0.5;
vec2 light_xy_fraction = lightCoordinate.xy - light_xy;
bool reverse_direction = lightCoordinate.w > 0.0;
ivec2 sign_xy = ivec2(sign(vec2(xy)));
bool horizontal = abs(xy.x + sign_xy.y) < abs(xy.y - sign_xy.x);
ivec2 axis;
axis.x = horizontal ? (+sign_xy.y) : (0);
axis.y = horizontal ? (0) : (-sign_xy.x);
// Apply wave offset
xy = axis * int(inGroupID.x) + xy;
vec2 xy_f = vec2(xy);
// For interpolation to the light center, we only really care about the larger of the two axis
bool x_axis_major = abs(xy_f.x) > abs(xy_f.y);
float major_axis = x_axis_major ? xy_f.x : xy_f.y;
float major_axis_start = abs(major_axis);
float major_axis_end = abs(major_axis) - float(WAVE_SIZE);
float ma_light_frac = x_axis_major ? light_xy_fraction.x : light_xy_fraction.y;
ma_light_frac = major_axis > 0.0 ? -ma_light_frac : ma_light_frac;
// Back in to screen direction
vec2 start_xy = xy_f + light_xy;
// For the very inner most ring, we need to interpolate to a pixel centered UV,
// so the UV->pixel rounding doesn't skip output pixels
vec2 end_xy = mix(lightCoordinate.xy, start_xy, (major_axis_end + ma_light_frac) / (major_axis_start + ma_light_frac));
// The major axis should be a round number
vec2 xy_delta = (start_xy - end_xy);
// Inverse the read order when reverse direction is true
float thread_step = float(inGroupThreadID ^ (reverse_direction ? 0u : (WAVE_SIZE - 1u)));
vec2 pixel_xy = mix(start_xy, end_xy, thread_step / float(WAVE_SIZE));
float pixel_distance = major_axis_start - thread_step + ma_light_frac;
outPixelXY = pixel_xy;
outPixelDistance = pixel_distance;
outDeltaXY = xy_delta;
outMajorAxisX = x_axis_major;
}
```
Yeah, I feel awful that I mostly copied and only minor-ly tweaked the code generously provided by Bend Studios.
(###) **Debug Rendering**
Debug rendering is the last feature I built up this month and it's mostly because I have a sense that I will _attempt_ the creation of a game very soon with the engine. It would probably be wise to wait a bit until the engine is more mature, but I think that's all the more reason to
dive into the deep end. Working in a 3d-space can be reasonably difficult. With no way to visualize what's going on, you might find yourself having great difficulty creating mechanics or debugging issues. I can't imagine a game engine without some sort of gizmo rendering.
So, there are 2 things that need to be done for a proper debug renderer: Gameplay and Physics. Gameplay speaks for itself, but I also need a way to inspect what's going on in the physics engine. Jolt has been a treat to work with so far, being fairly straightforward to implement.
The Jolt debug renderer is no exception. Well, not exactly. A full on Jolt debug renderer seems to be very complex and I'm not looking forward to doing it, but Jolt has graciously demonstrated a simpler debug renderer implementation in a sample called `SimpleDebugRenderer`. It just outputs
triangles and lines to be drawn, which I can just hook up to my debug renderer I intend on making for gameplay.
One interesting thing about gizmos from my time making small games with Unity is that the gizmos require their respective draw command to be called every frame to be drawn consistently. Makes sense, and from a debugging ergonomics perspective it is a very reasonable approach. A little of
"reverse engineering" Unity gizmos indicates that perhaps it is wisest to implement debug rendering with an "immediate rendering". Where we accumulate a draw buffer throughout the frame then upload and draw these vertices to the draw image. Sounds terribly slow, but a few things:
1. You wouldn't want to draw that many debugs anyway
2. "Debug" in Debug Renderer means that this isn't going to be in the shipping/release build, so the performance concern is not as great
3. It is very hard to batch/retain debug renders as it changes quite frequently
4. Most importantly, development speed is significantly fast when using this simple model. Enough to outweigh the performance detriment.
I approached the gameplay debug renderer with 3 different pipelines (and eventually added another pipeline after that):
- Line Rendering
- Line rendering is useful for a lot of things, it's a simple shape and only needs 2 things to describe it: positions and color. I can imagine using to test raycasts, distance checks, threshold checks; lots of things you could use a line renderer for!
- Triangle Rendering
- Triangle rendering isn't quite as useful, this one is primarily to support the debug renderer from Jolt. But it could be useful for plane tests (though it'd need to be called twice to form a plane)
- Instanced Rendering
- This one I'm not sure is done by other debug renderers, but I thought could be useful for my needs. There are frequently common shapes that I think could be better batched like squares, spheres, and maybe capsules/cylinders. Rather than specifying their commands to draw lines/triangles, I thought to use instancing. So you'd only need to specify which shape, model matrix, and color. This allows me to draw hundreds of squares with minimal loss to performance.
Pretty easy to implement, though I did face some issues when trying to integrate it to the main pass. I noticed TAA did not work at all with the debug lines; causing them to be larger than their intended size. I also don't really mind aliasing on these debug elements, as they're just debug. I prefer accuracy over
prettiness when debugging my application.
So, I decided to accumulate all the debug draws into its own separate debug render target (r8 format), and do a separate composite pass with the final image before outputting to the swapchain. This of course, results in significant aliasing, but it worked like a charm. Because the depth buffer is jittered,
depth testing may behave slightly incorrectly when testing against the depth buffer. To fix this, I decided to jitter my debug fragments and unjitter during the composite step. This worked fine though does lead to some blurring, not really sure why. In the worst case, if the blurring bugs me too much, I can strictly disable TAA in the "editor".
While working on debug rendering I decided to just implement a simple outline debug to show what item I was currently selecting. I would use a stencil buffer to draw my render object of choice (by the way this is pretty much hard-coded to draw my representation of meshes, it will require significant changes to support anything else).
Then I would put the stencil buffer through another pass that would do a filter for each fragment to check if it is an edge. If so, the debug render target (the same one for the debug renderer) would be written to. This can certainly be expanded with the use of a depth buffer to get depth contours, but I can leave that for another time.
Anyway, having a singular outline around the object looks terrific.
(###) **Summary**
A reasonably productive month, though admittedly I've been devoting slightly less time to my engine than usual. Been playing a bit more video games with my brother. We don't (didn't) play together often and now am spending quite a lot of time with him.
Mostly playing F1 24, he's big into racing. I'm not so big into racing myself but the game is reasonably fun and I like to mess around in-game too. We (I) plan on getting F1 25 on release day since we played F1 24 a lot, hopefully it's fun; not really familiar with what makes a good racing game, I just play with a controller.
Anyway, I'll finish off by shooting out a few lists on plans for the near and far future of this engine. I hope you have a nice day. As always, I'm always happy to discuss engine/renderer related topics so feel free to contact me through email at twtw40@gmail.com or through discord `williscool`.
(####) **Major Hurdles**
- Multithreading
- Releasing an Actual Game
- Reflection (Can't wait for c++26)
- Move back to MinGW instead of visual studio so compilation can be done on linux
(####) **Planned Features**
- Mesh Skinning (GPU)
- Animations
- Grass Rendering (Ghost of Tsushima)
- Better Terrain
- Better Shadow Mapping
- Custom Shader Support
- Material Properties (Per-Object Shader Properties)
- Texture Compression
- Physics Materials
- Sound!
(###) **Music**
[Lenny Kravitz - Blue Electric Light](https://open.spotify.com/album/33i9bBiL7PuwD5hEG9GoUi?si=8F4lNB_CR2adZFf2D4XDVw)
[levitation room - Strange Weather](https://open.spotify.com/album/7zBLmnvUYVum6Rv0ytOD4T?si=QvTT2WBVQyWfI16d755rZA)
[Paul Weller - 66](https://open.spotify.com/album/1Mjh8aa3oKEaDO9U1uwhEp?si=z7u9UD7ZS2SJZ-9mI-aahw)
[Mannequin Pussy - I Got Heaven](https://open.spotify.com/album/5ROzqM7rbMYoKbQIw4i7fp?si=pvzesegURTmajGKwMnoQIA)